
The SIP (Sprint In Place) Protocol
Experimental work around a protocol for sprint profiling and rehab progressions

In response to the influx of similar questions I’ve been getting since sharing posts like THIS of what has been coined the “SIP” drill, this article aims to answer some of the preliminary questions around setting it up and analysing the data. I cannot emphasize enough that this is early days, completely experimental, and we are constantly making (and open to further) refinements.
The drill detailed in this article originates from Derek Hansen, a world-renowned sprint coach based in Vancouver, with whom I’ve had the privilege to collaborate. Derek has long incorporated this drill—derived from the legendary Gerard Mach drill series—into his rehabilitation and performance continuum.
Rooted in principles that date back decades, these drills have stood the test of time. When paired with modern objective measurement tools like ForceDecks, they offer a unique blend of tradition and technology: giving practitioners an objective way to profile sprint mechanics and guide return-to-run progressions.
This blog outlines how we’ve adapted Derek’s approach to a force plate-based version of the Sprint In Place (SIP) drill, providing practitioners with a repeatable method for assessing force output, limb coordination, and neuromuscular function—without requiring the athlete to sprint horizontally at full speed.
Why test a Sprint In Place on Force Plates?
The A Run is a cornerstone sprint drill, emphasizing knee lift, hip flexion, stiffness on ground contact, and timing through cyclical motion. When tethered in place and executed on force plates, it allows practitioners to:
Quantify force application per contact
Evaluate limb-to-limb symmetry
Detect early asymmetries or coordination issues
Achieve adequate energy system stimulus that athletes may lose during injury recovery
This setup turns a standard drill into a diagnostic tool—ideal for both high-performance environments and return-to-sport pathways.
Equipment and Setup
✅ Force Plates
We recommend using ForceDecks Max where possible. Their larger surface area increases the likelihood that the athlete maintains clean, consistent foot contacts throughout the drill.
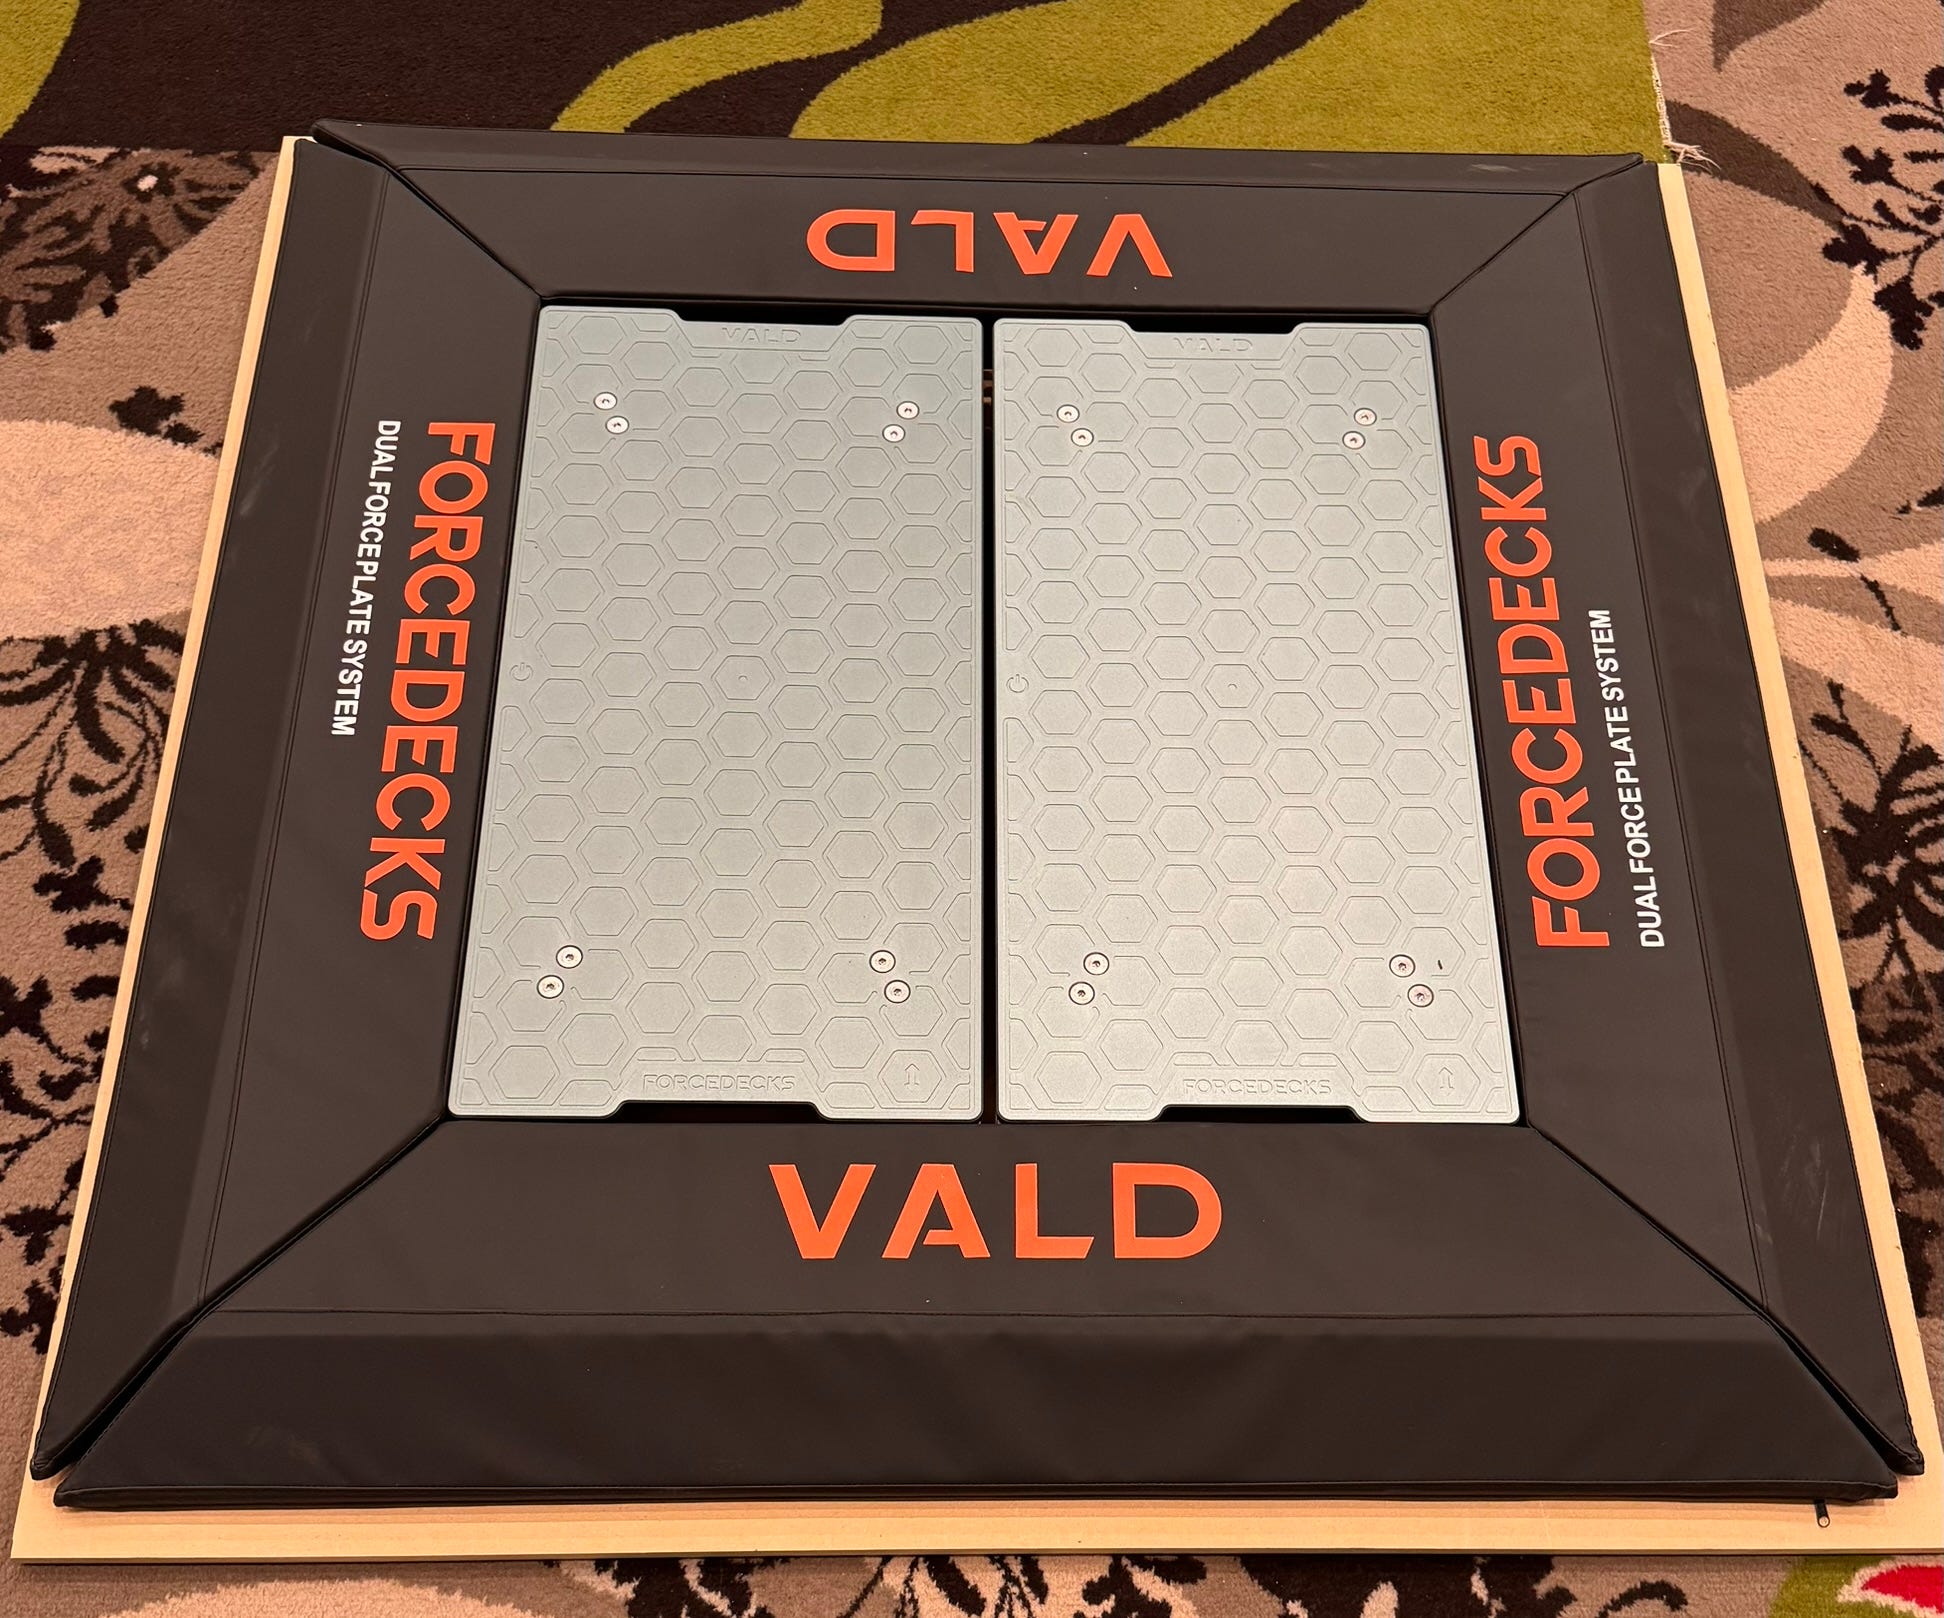
If you're using ForceDecks Lite, make the following adjustments:
Add foam surrounds for safety
Place plates tightly side by side to reduce risk of stepping off or between plates
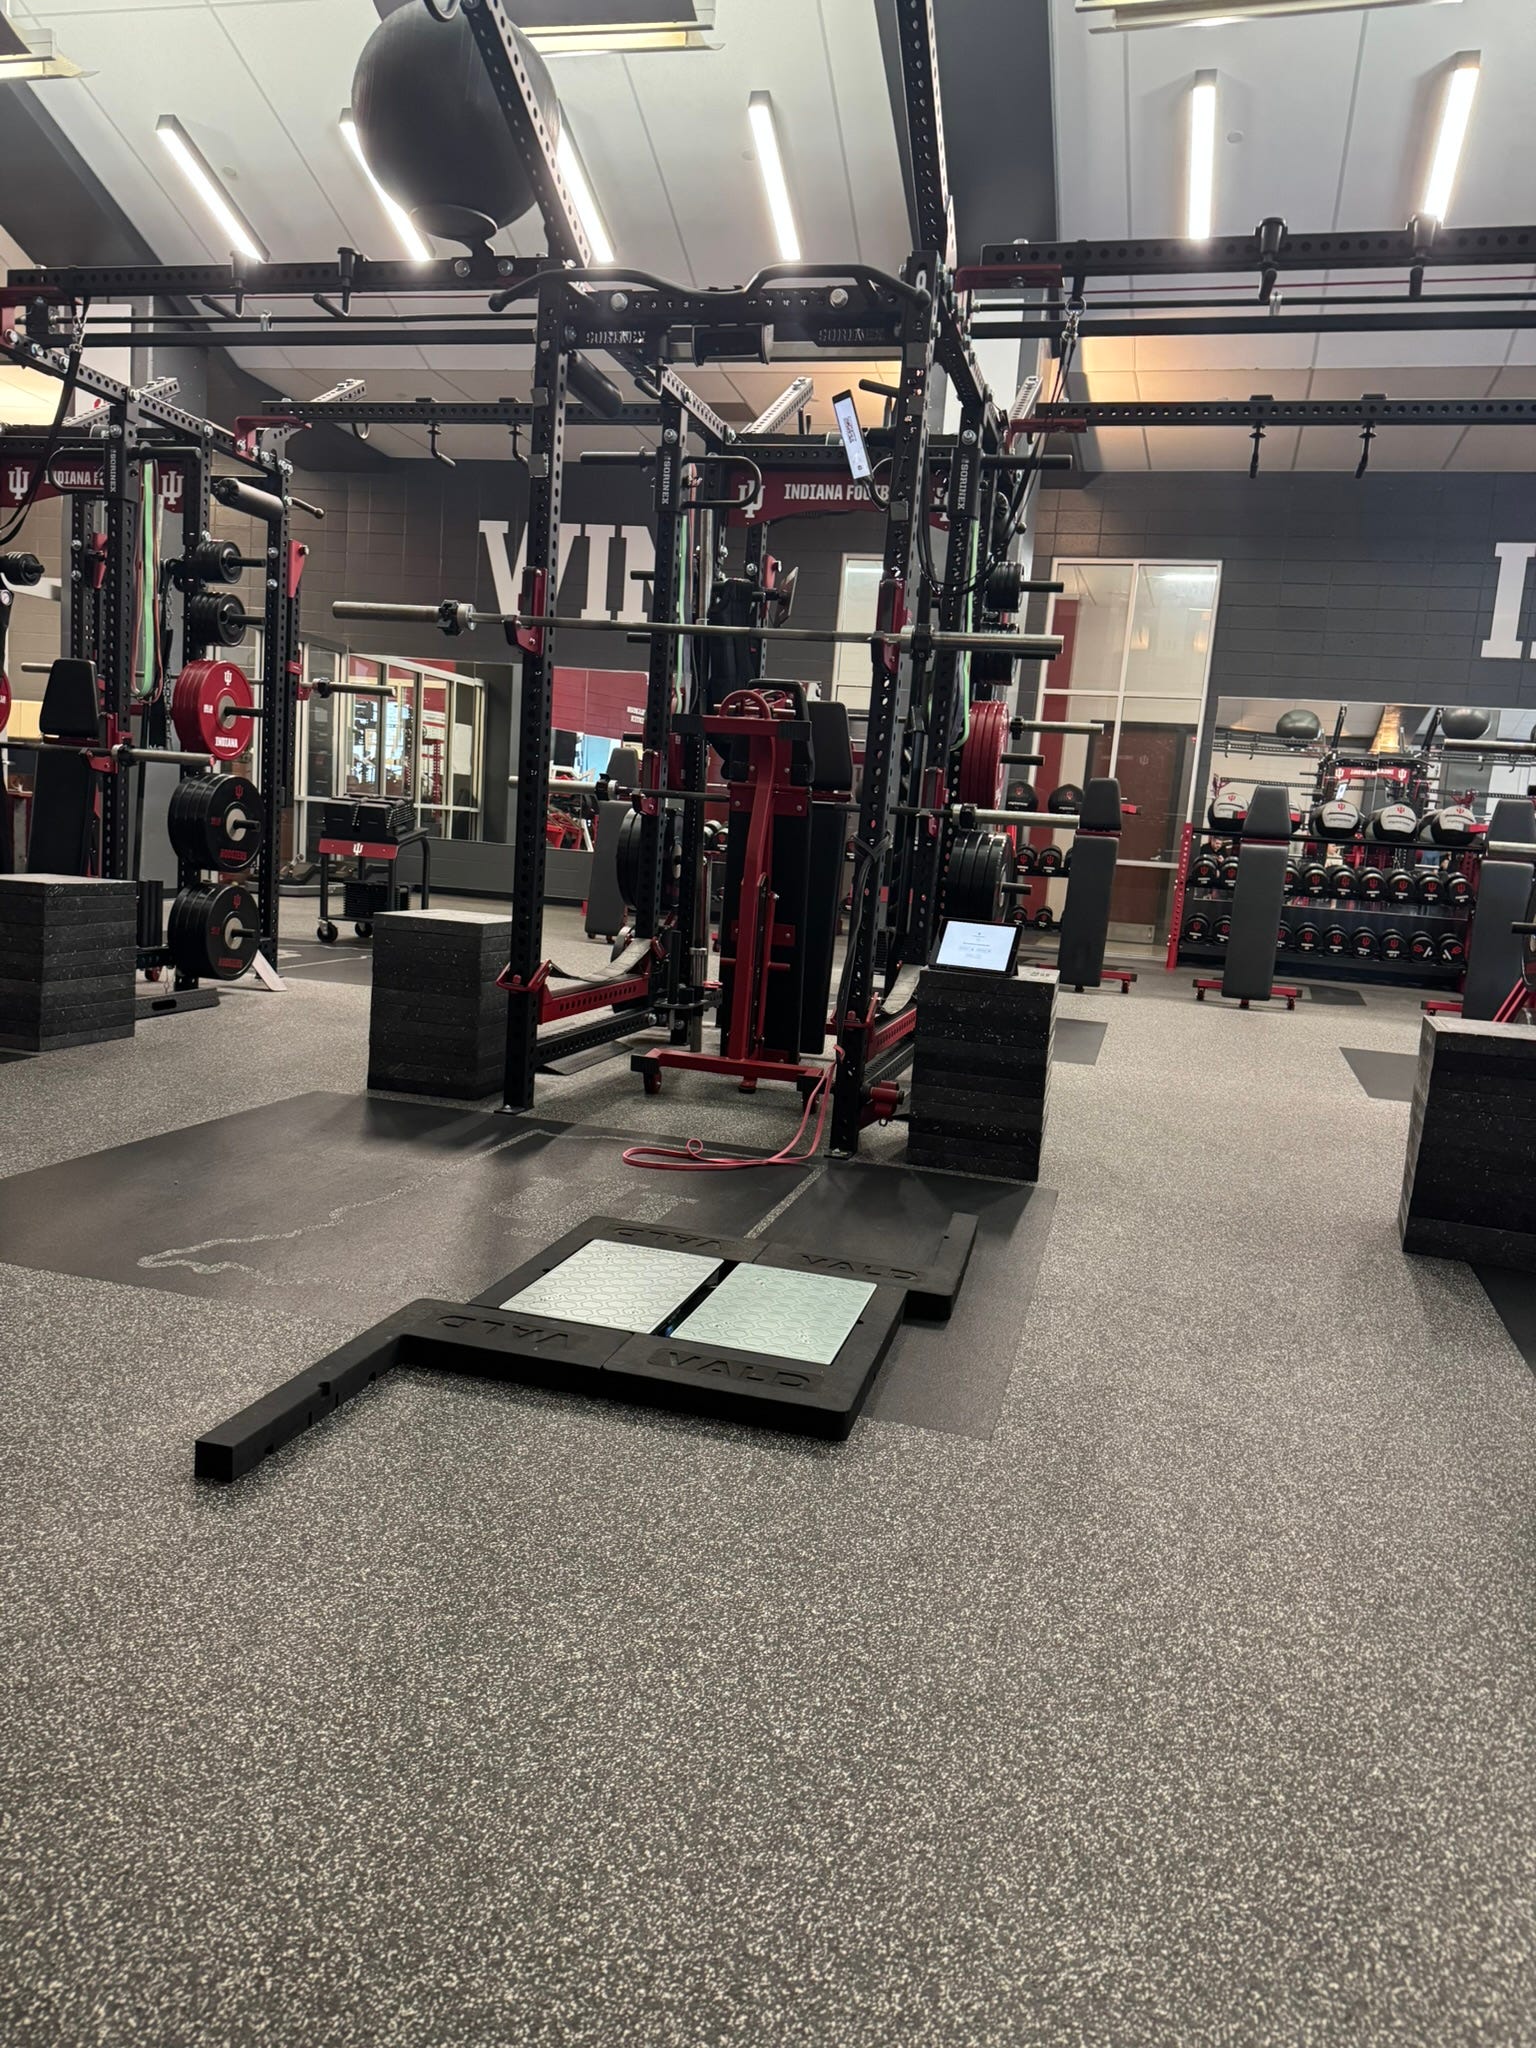
✅ Tethering System
Use two standard resistance bands, looped through one another to create a longer tether.
Anchor the band at hip height—a squat rack is usually perfect in the gym environment
The athlete should face forward, standing on both force plates.
The tether should have just enough tension to keep them stationary during the drill—no drifting forward or being pulled backward.
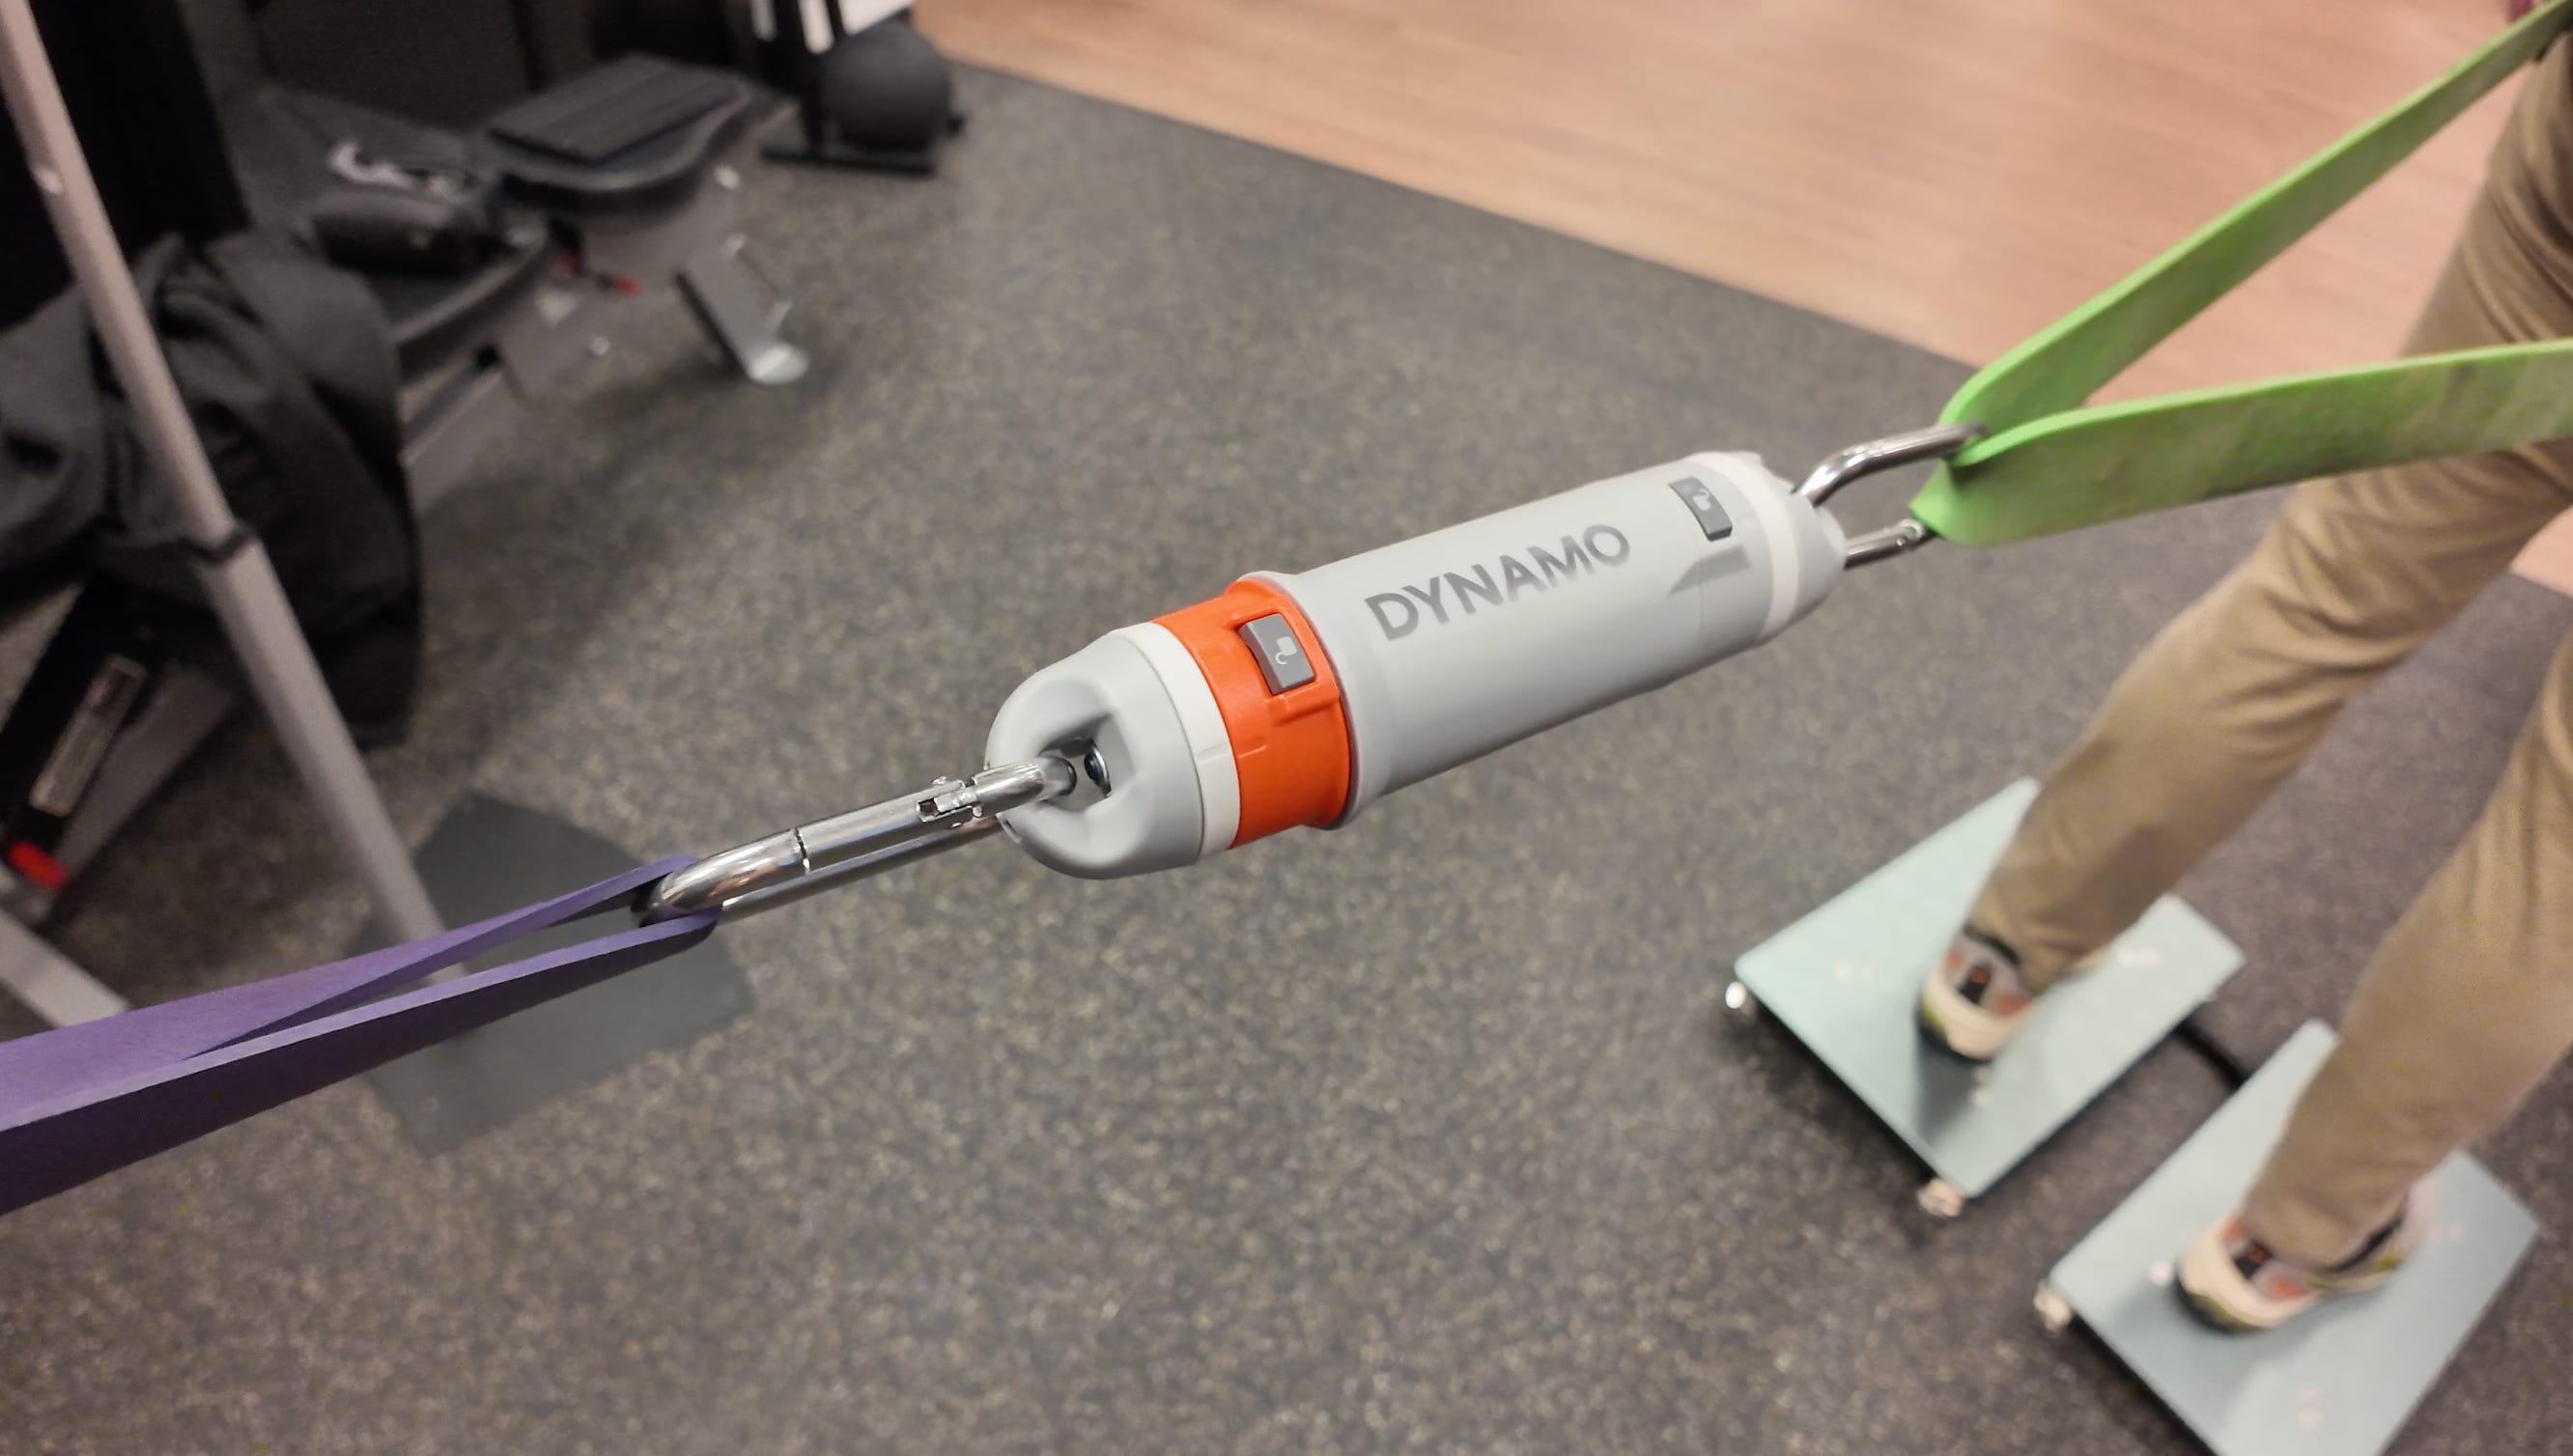
To ensure precision, we recommend using a tensile dynamometer to quantify resistance. Aim for 2-4kg of tension, but ultimately base the tension on a level the athlete feels comfortable with.
✅ High Frame Rate Camera
A camera is always an optional ‘nice to have’ when testing your athletes. For this drill however, I’d recommend it as a prerequisite.
Use a camera with 60FPS as a bare minimum (most IPhone’s are capable of this). I prefer using 120 or 240FPS camera’s when I have access. Where possible, mount the camera to a tripod as well.
I prefer to use a DJI OSMO Pocket 3 for it’s portability and high frame rates.
Having video footage of each reps allows you to add context to data first and foremost. However in a drill like this, it also acts as a quality assurance check. When interpreting data, it’s crucial you understand that the reps you’re looking on force plates were performed with excellent technique.
Examples of when a camera can ‘save the day’ would be a rep where the athlete’s foot crosses midline and lands partially on both plates (this may affect left vs right data). With the visual feedback you can quickly avoid integrating that rep to your analysis.

Protocol Walkthrough
1. Weigh the Athlete
Prior to placing the resistance band on their body, begin by having the athlete stand still on the force plates to record their body weight in the ForceDecks iOS app.
Tip: Multiply body mass (kg) × 9.81 to calculate weight in newtons. This becomes a key reference for analyzing force relative to bodyweight visually on the force trace.
2. Perform a detection rep
Before starting the drill:
Record a Countermovement Jump (CMJ) (or any standard jump test)
This ensures that the session is logged and auto-detected correctly in ForceDecks iOS. The Sprint In Place drill will not be recognised on auto detect mode in isolation.
3. Perform the Run in Place Drill
The athlete begins a high-knee A Run, maintaining rhythm and ground contact with both plates. Ensure:
Arms are active and coordinated with the legs
Posture is upright and stable
Drill lasts 5–10 seconds, aiming for consistent maximal effort
Allow the athlete time to build their tempo and rhythm before timing a max effort rep.
Data Processing and Analysis
✅ Upload the test from the ForceDecks iOS App
Once the drill is complete:
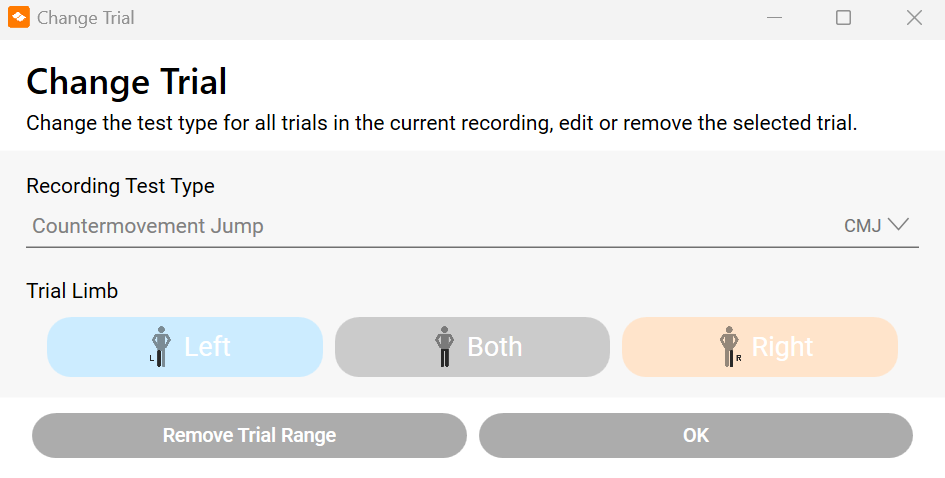
The data will automatically be uploaded as a CMJ.
Open the session on the ForceDecks Windows software and change the test type to:
General Force-Time Analysis (GFTA)
This reclassifies the session for manual review and clipping.
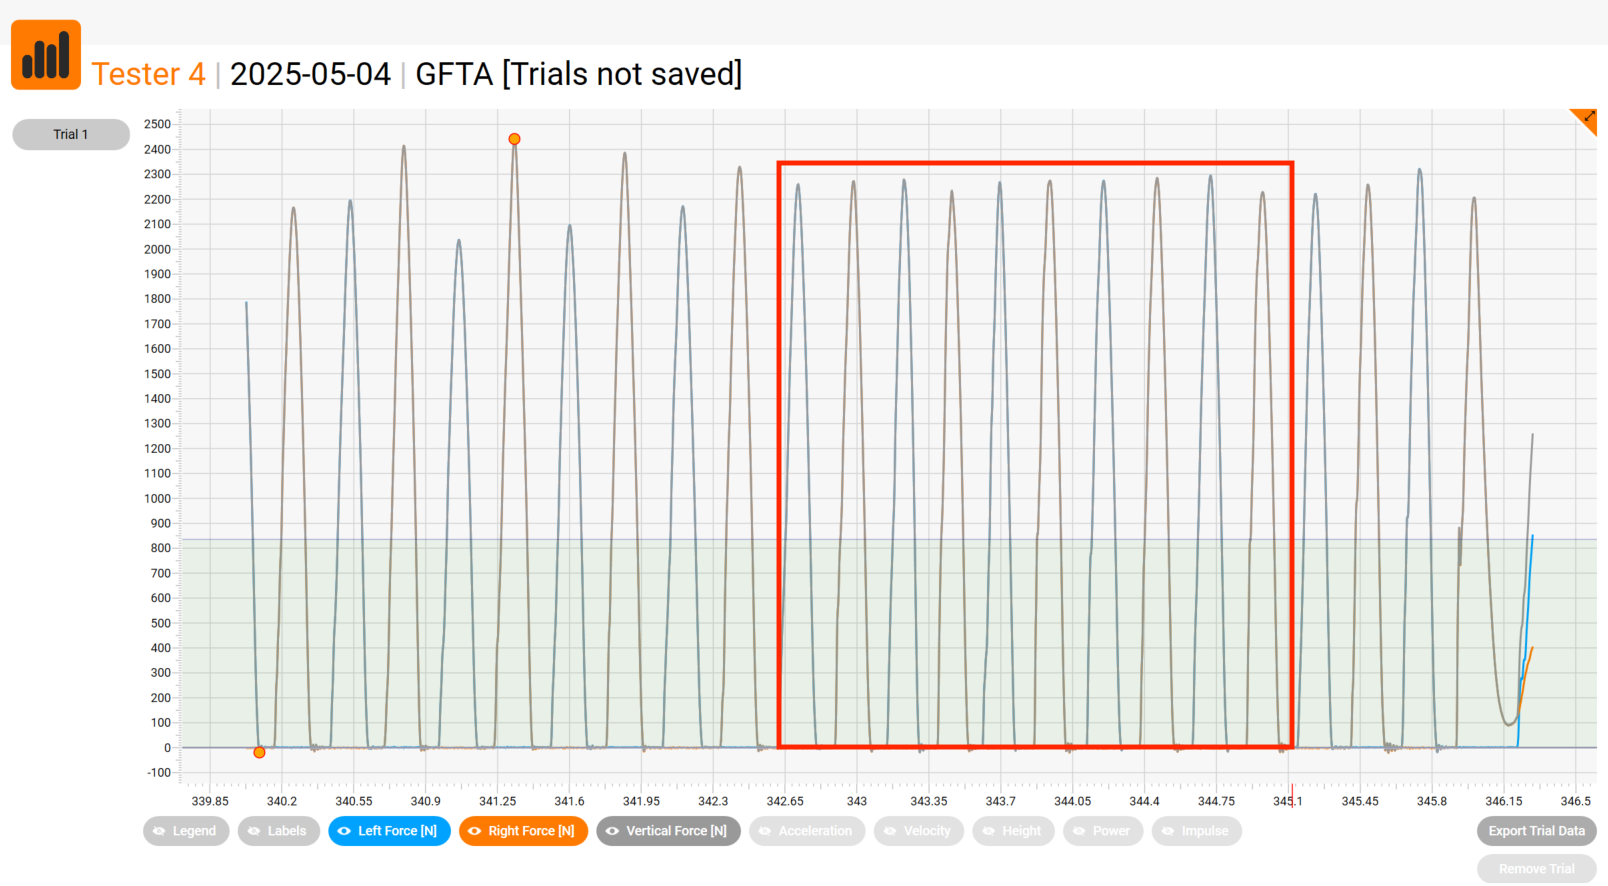
✅ Clip the Force-Time Trace
Remove trial range for the countermovement jump trace.
Locate a 10-contact window (5 left, 5 right) mid-set for analysis.
Avoid early reps to ensure consistency and that the reps chosen are during the maximal effort period.
My rule of thumb currently is to identify 10 consecutive and consistent reps for analysis. This is to reduce the time demand of analysing all contacts but also to ensure we can have confidence in 5 quality contacts per leg.
Key Metrics to Review
From the selected reps, assess the following:
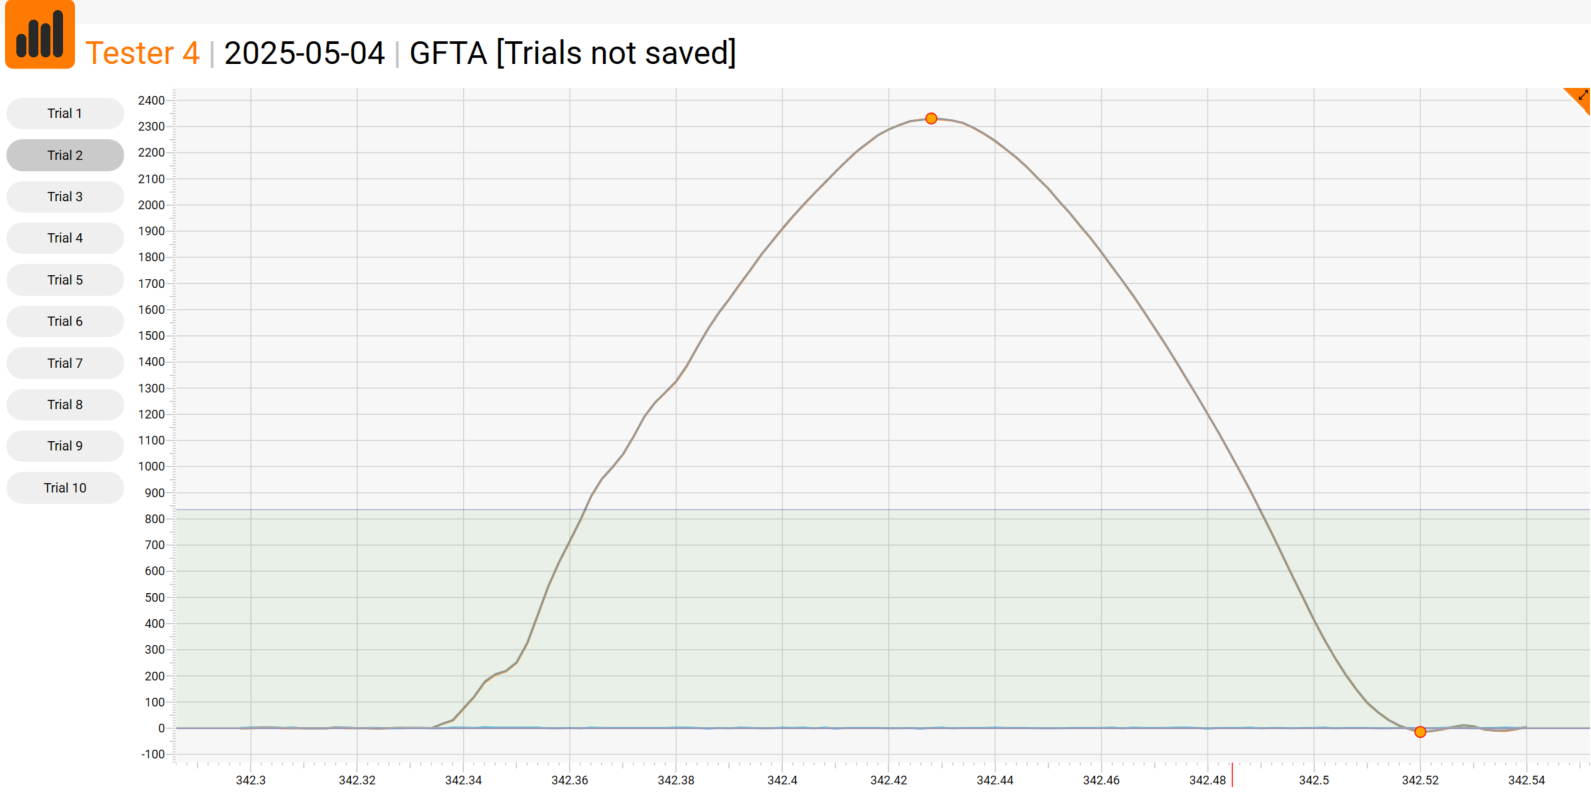
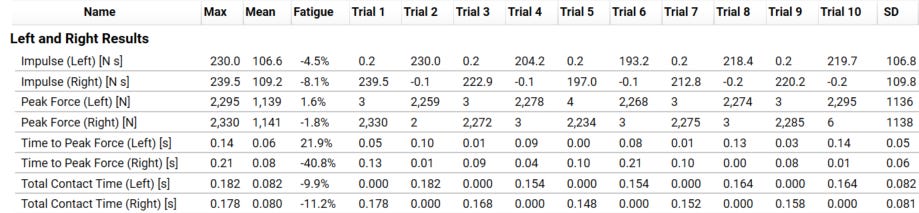
Peak Force (N) - Max force applied per contact, per limb.
Time to Peak Force (ms) - Reveals timing and interlimb coordination.
Contact Time (ms) - Shorter is typically more efficient.
Force Relative to BW - Standardizes effort; ideal for rehab and profiling, especially when you want to understand the potential demand of a drill for an athlete at various stages of the RTP continuum.
Example: If an athlete applies 600 N on a single contact and their body weight is 800 N, that's ~0.75 xBW.
Interpreting the Data: From Complexity to Clarity
Analyzing a force-time trace from a SIP drill can quickly become overwhelming—especially with higher rep counts. A 6–10 second burst can contain dozens of ground contacts, making it time-consuming to assess every contact.
To streamline this process without sacrificing accuracy, we isolate 10 consistent and consecutive contacts from within the set—typically after the initial few seconds once rhythm has been established. This avoids early variability or late fatigue noise and provides a focused snapshot of performance.
Five left, five right: This ensures balanced analysis between limbs.
Mid-set sampling: Prioritizes high-quality, efforts during the peak of max effort.
Rep-by-rep interpretation: Allows us to detect mechanical trends or asymmetries on an individual limb basis.
Rehab and Performance Applications
By anchoring performance to force relative to bodyweight, we can:
Track neuromuscular readiness during return to sprinting
Detect early asymmetries before they surface in full-speed efforts
Provide a safe, objective stimulus in early to mid-stage rehab
Here's how the required demand of these drills fit into a broader sprint progression, based on strictly anecdotal experience so far;
A-March Drill ~ 1.1-1.4 x BW
A-Run ~ 2.0 - 3.0 x BW
Horizontal Acceleration ~ 2.2 x BW (Wilkau et al, 2020)
Terminal Swing Phase of Max Velocity Sprinting ~ 6.0-8.0 x BW- (Sun et al, 2015)
The Running In Place drill sits at the low-force end of the spectrum, making it ideal for bridging vertical control work into horizontal sprint tasks.
Final Thoughts
It’s so early days here, but the more I’m exposed to this protocol, the more I genuinely believe it reflects the best of both worlds—decades of proven sprint training methodology and modern, objective testing tools. Derek Hansen’s influence and refinement of the Mach-style drills offer a confident foundation. When performed on ForceDecks, they have the potential to reveal the kind of detailed, repeatable data that supports better decision-making across performance and rehab settings.
It’s simple, safe, has the potential to become scalable—and for practitioners using ForceDecks, it opens the door to a new layer of insight beyond the norm. There is more nuance and context required to be weighted heavily in the testing process than many other tests, but I believe it might be the start of something very insightful.